Data preparation for NannyML

Monitoring Machine Learning in Python

Hakim Elakhrass

Co-founder and CEO of NannyML

Loading the data

dataset_name = "green_taxi_dataset.csv"
data = pd.read_csv(dataset_name)
data.head()

The image is a screenshot of the first five rows of the dataset.

Monitoring Machine Learning in Python

Processing the data

# Create data partition
data['partition'] = pd.cut(
    data['lpep_pickup_datetime'],
    bins= [pd.to_datetime('2016-12-01'),
           pd.to_datetime('2016-12-08'),
           pd.to_datetime('2016-12-16'),
           pd.to_datetime('2017-01-01')],
    right=False,
    labels= ['train', 'test', 'prod']
)
Monitoring Machine Learning in Python

Splitting the data

# Target column name
target = 'tip_amount'
# Features column name
features = ["PULocationID", "DOLocationID", "trip_distance", "VendorID", "pickup_time"]
# Train set
X_train = data.loc[data['partition'] == 'train', features]
y_train = data.loc[data['partition'] == 'train', target]

# Test set (later reference set)
X_test = data.loc[data['partition'] == 'test', features]
y_test = data.loc[data['partition'] == 'test', target]

# Production set (later analysis set)
X_prod = data.loc[data['partition'] == 'prod', features]
y_prod = data.loc[data['partition'] == 'prod', target]
Monitoring Machine Learning in Python

Building the model

  • Train LGBMRegressor using lightgbm library
  • Evaluate the model on a test set
  • Deploy the model
# Training the model
model = LGBMRegressor(random_state=42)
model.fit(X_train, y_train)

# Making predictions
y_pred_train = model.predict(X_train)
y_pred_test = model.predict(X_test)

# Evaluating the model on train and test set
mae_train = MAE(y_train, y_pred_train)
mae_test = MAE(y_test, y_pred_test)

# Deploying the model to production
y_pred_prod = model.predict(X_prod)
Monitoring Machine Learning in Python

Creating reference and analysis sets

Reference period

  • Uses a test set

  • Requires ground truth

  • Set the baseline performance

Analysis period

  • Latest production data

  • Ground truth is optional

  • NannyML analyzes the data drift and the performance

# Creating reference set
reference = X_test.copy() # Test set features
reference['y_pred'] = y_pred_test # Predictions
reference['tip_amount'] = y_test # Labels
reference = reference.join(
    data['lpep_pickup_datetime']) # Timestamp
# Creating analysis set
analysis = X_prod.copy() # Production features
analysis['y_pred'] = y_pred_prod # Predictions
analysis = analysis.join(
    data['lpep_pickup_datetime']) # Timestamp
Monitoring Machine Learning in Python

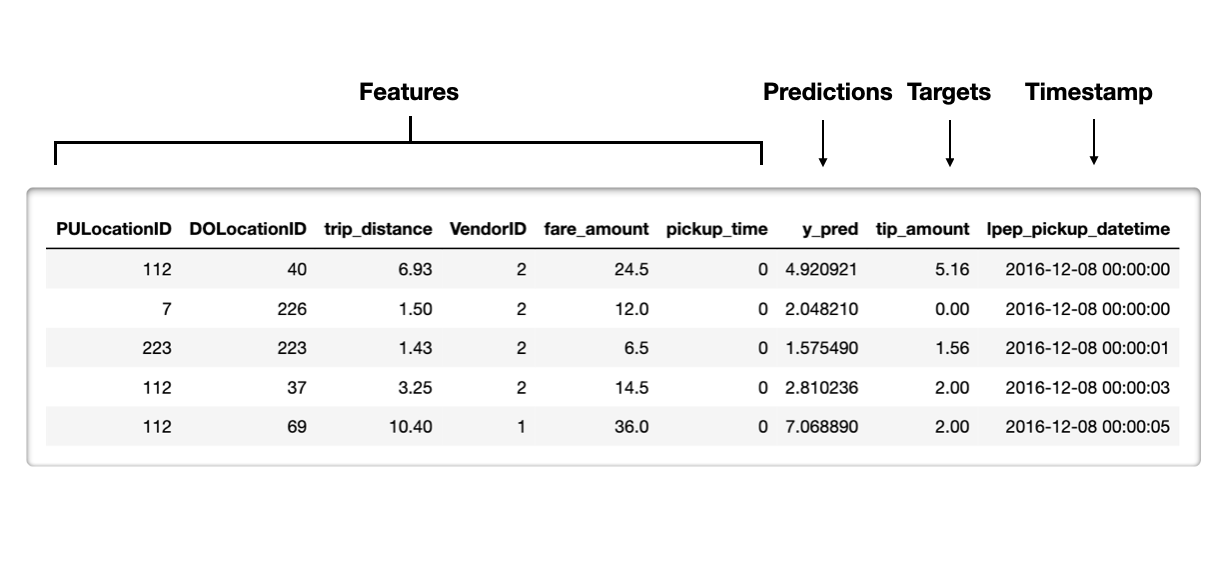
Reference set example

  • Timestamp - the time when observation occurred (optional)
  • Features - features fed to our model
  • Model outputs
    • Predictions - prediction score outputted by the model
    • Prediction class labels - thresholded probability scores
  • Target - contains ground truth

The image shows the first five rows from the reference set.

Monitoring Machine Learning in Python

Let's practice!

Monitoring Machine Learning in Python

Preparing Video For Download...