Başlık ve kenar çubuğu

shinydashboard ile Panolar Oluşturma

Png Kee Seng

Researcher

Başlık

  • Başlık, restoran tabelası gibidir
  • Gösterge paneli başlığını içerebilir
  • Açılır menüler içerebilir
    • Örn. mesajlar, bildirimler, görevler

Basit bir vitrin örneği.

Başlık restoran tabelası gibidir. Pratik veya estetik öğeler içerebilir. İşte karmaşık bir ön yüz örneği.

1 Görsel: upklyak, Freepik
shinydashboard ile Panolar Oluşturma

Shinydashboard başlığı

  • Başlık dashboardHeader() ile tanımlanır
  • Başlık çok uzunsa ne olur?
    • titleWidth argümanını ayarlayınız
    • Varsayılan 230 pikseldir
header <- dashboardHeader(title = "Soccer tournament")
header <- dashboardHeader(title = "Analysis for global soccer tournament")
                            titleWidth = 400)
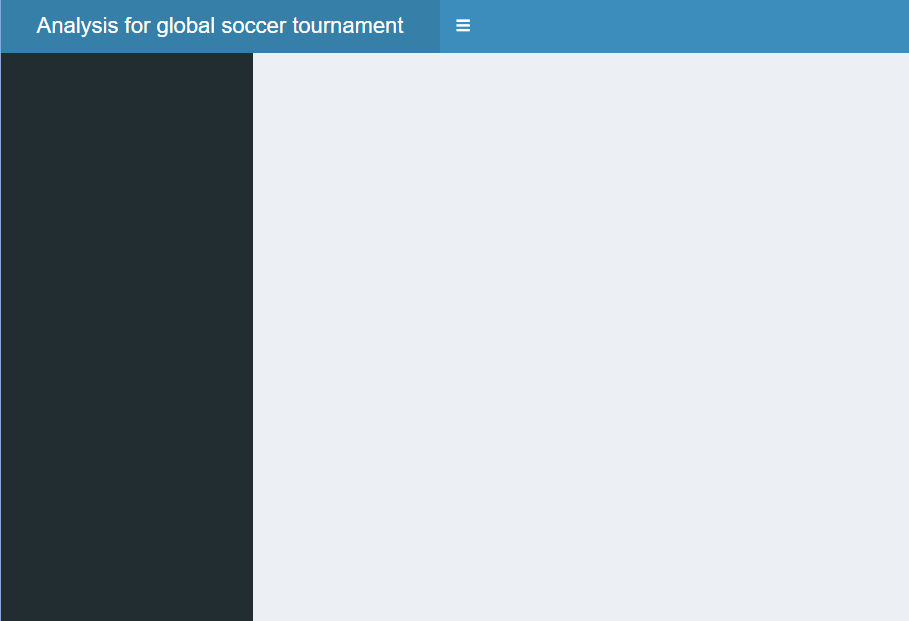
Uzun başlıklar için başlık genişliği ayarlanabilir.

shinydashboard ile Panolar Oluşturma

Bir mesaj içeren açılır menü ekleme

  • Başlığa açılır menüler eklenebilir
  • Üç tür açılır menü
    • Mesajlar
    • Bildirimler
    • Görevler
  • type değeri "messages" olan dropdownMenu() ekleyiniz
    • Bir messageItem() ekleyiniz
    • Varsayılan simge icon("user")
    • time ayarlanabilir
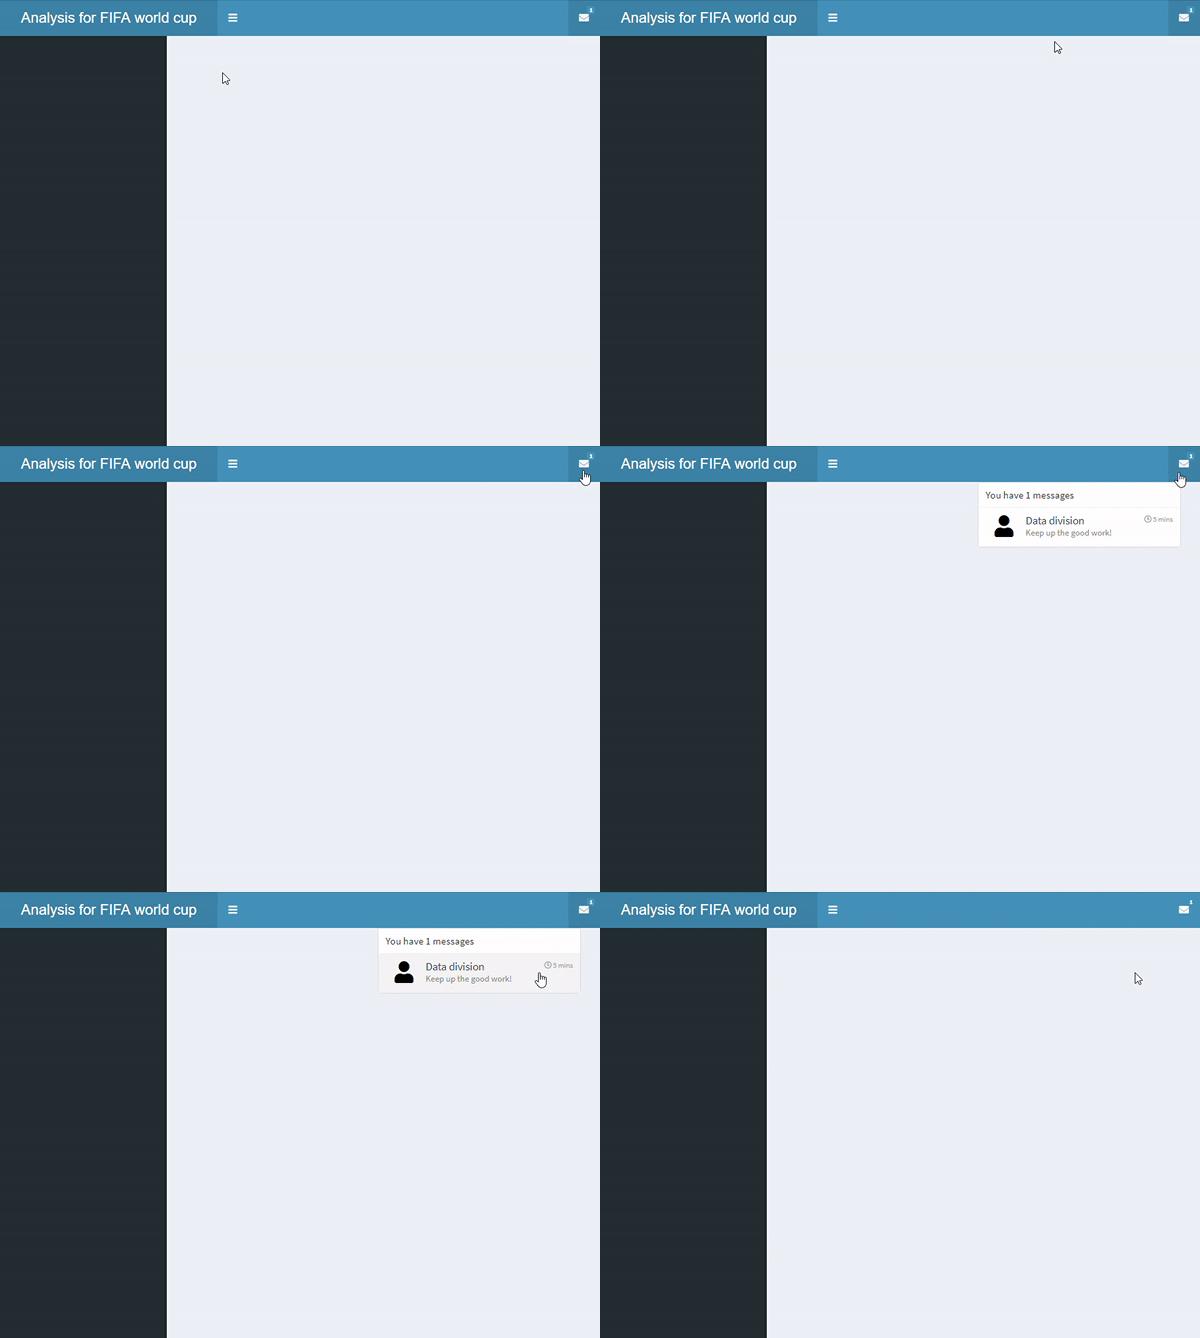
header <- dashboardHeader(
  title = "Analysis for FIFA world cup",
  titleWidth = 300,
  dropdownMenu(type = "messages",

messageItem("Data division", "Keep up the good work!",
time = "5 mins"
)))

Tek mesaj öğeli açılır menü.

shinydashboard ile Panolar Oluşturma

Birden çok mesaj içeren açılır menü ekleme

  • dropdownMenu() içine "Twitter" adlı başka bir messageItem() ekleyiniz

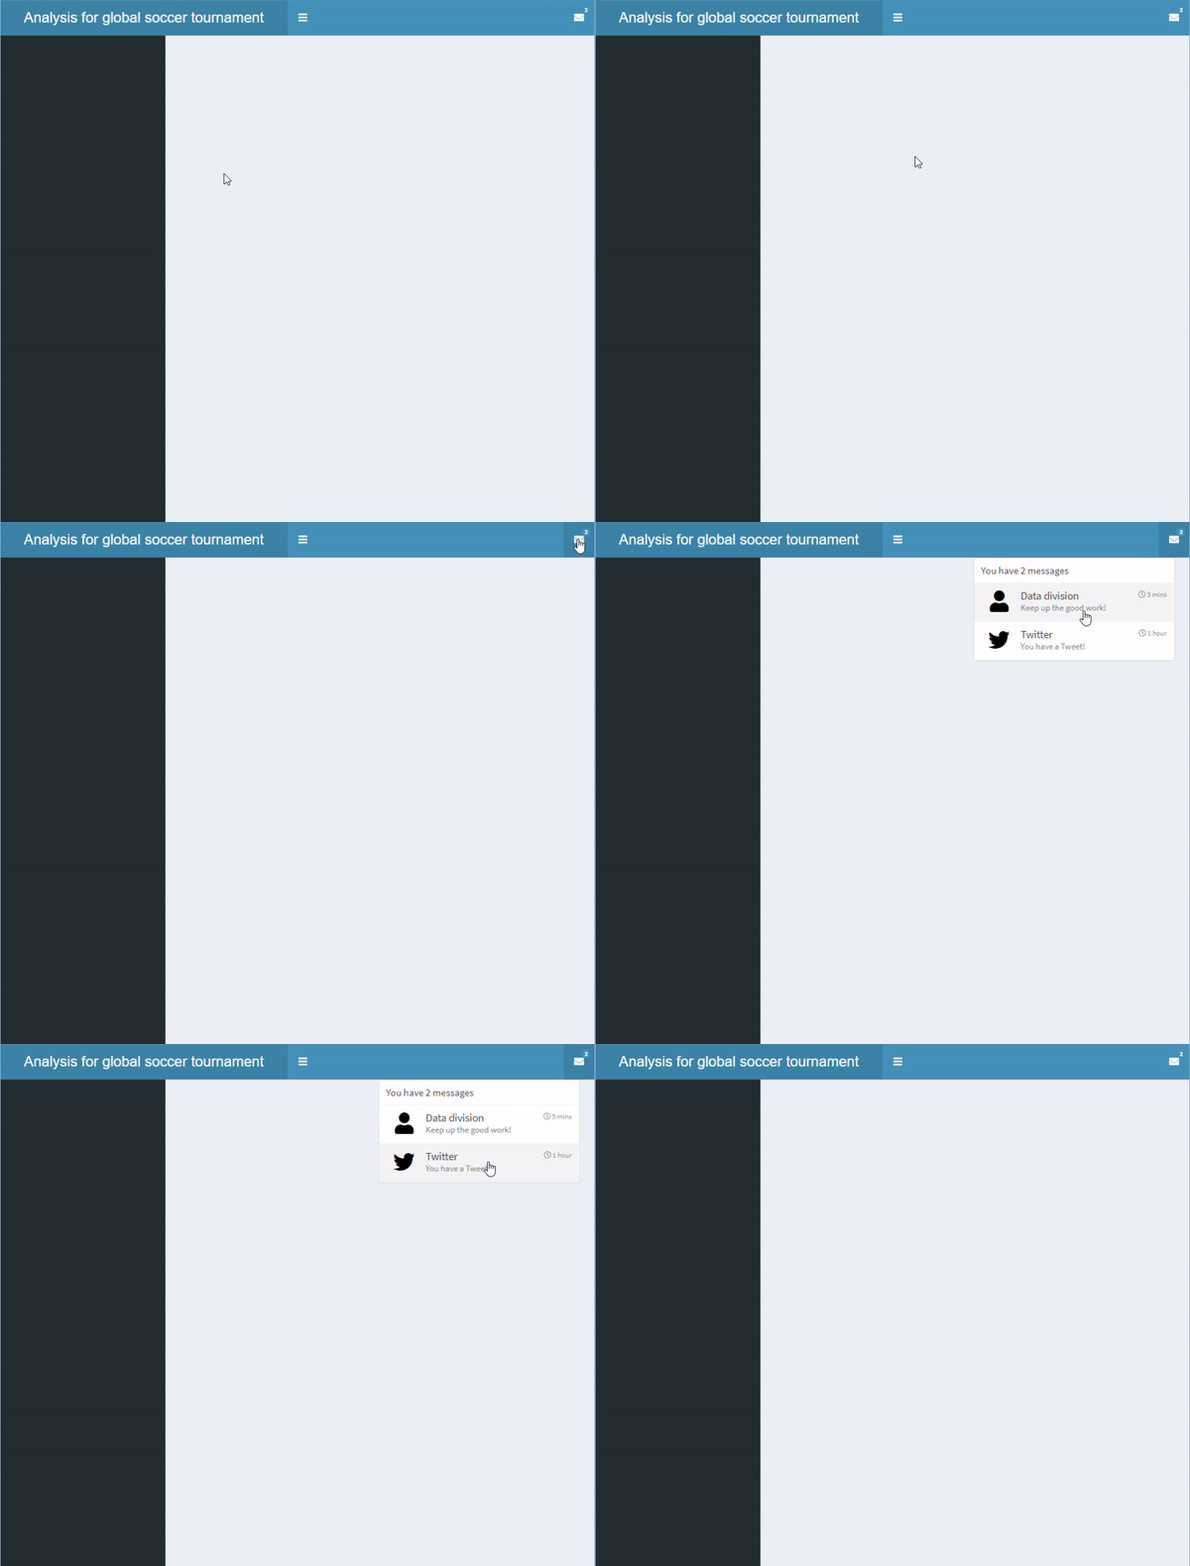
İki mesaj öğesi olan bir açılır menü.

header <- dashboardHeader(
  title = "Analysis for global soccer tournament",
  titleWidth = 400,
  dropdownMenu(type = "messages",
    messageItem("Data division",
      "Keep up the good work!",
      time = "5 mins"
    ),

messageItem("Twitter", "You have a Tweet!", time = "1 hour", icon=icon("twitter") ) ) )
shinydashboard ile Panolar Oluşturma

Birden çok öğe içeren açılır menü ekleme
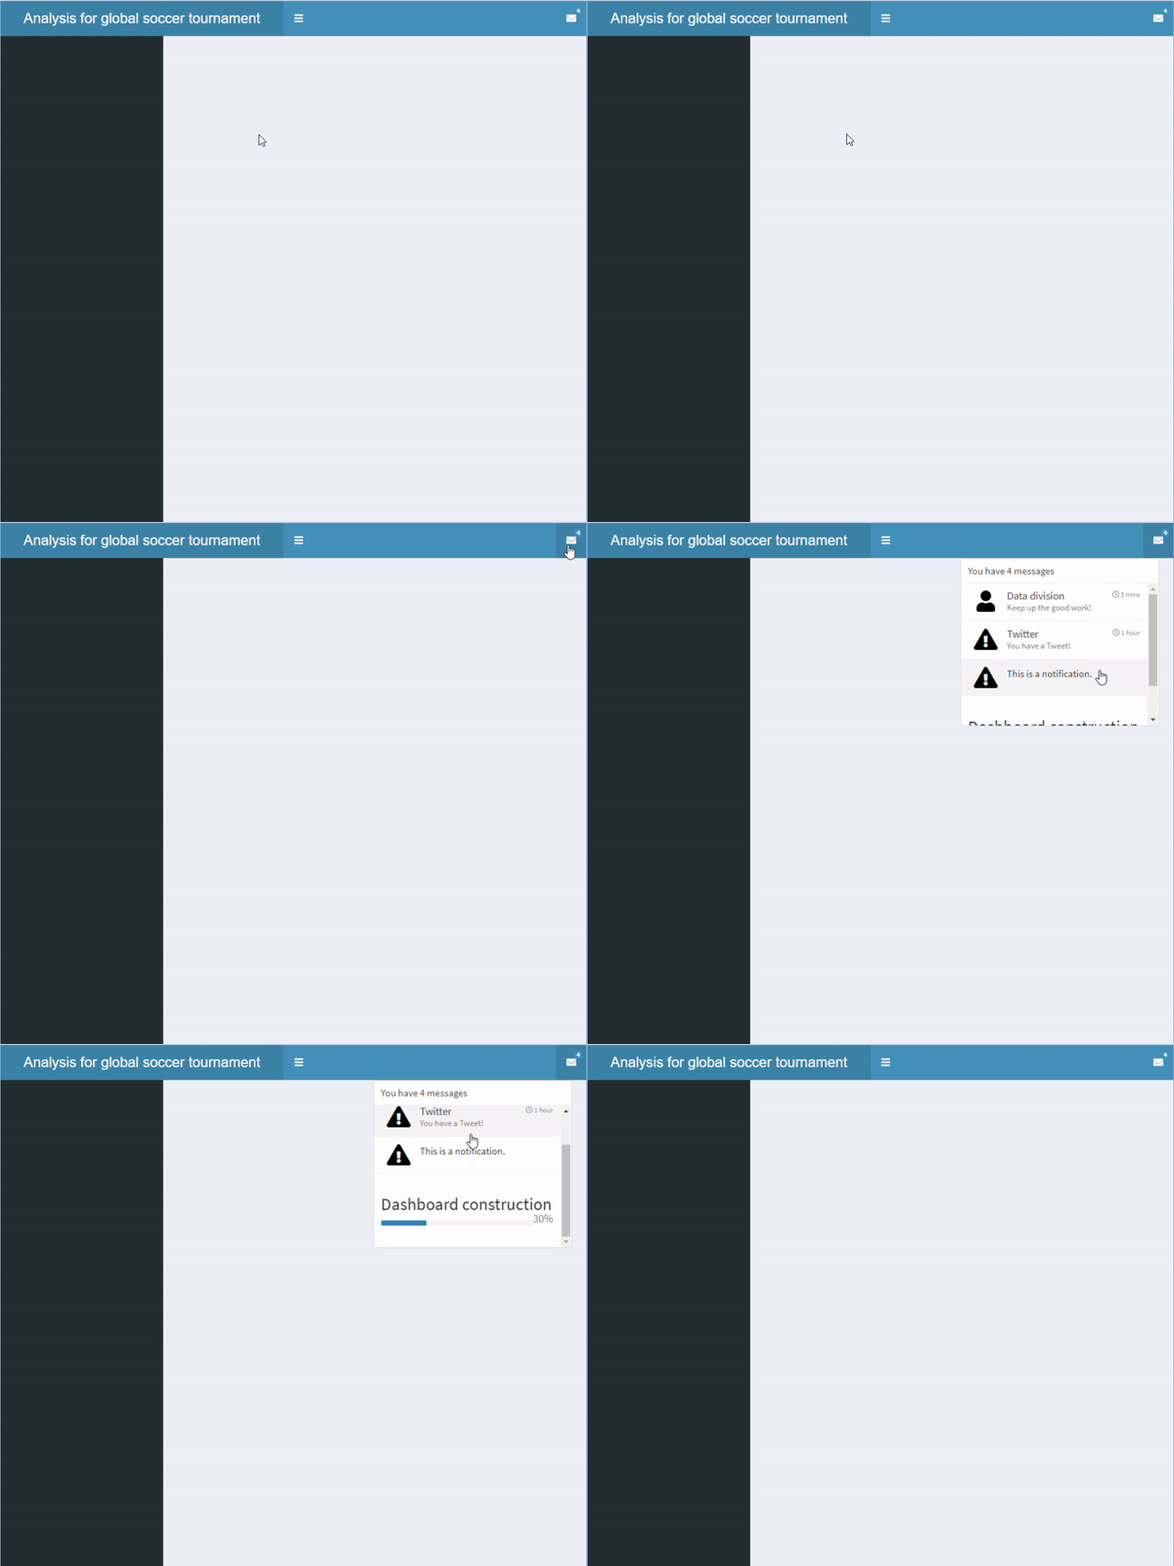
  • Başka türde öğeler de ekleyebiliriz
    • messageItem()
    • notificationItem()
    • taskItem()
  • Görünüşleri farklıdır
    • messageItem(): Varsayılan simge icon("user")
    • notificationItem(): Varsayılan simge icon("exclamation-triangle")
    • taskItem(): İlerleme çubuğu içerir
header <- dashboardHeader(
  title = "Analysis for global soccer tournament",
  titleWidth = 400,
  dropdownMenu(type = "messages",

messageItem("Data division", "Keep up the good work!", time = "5 mins"), messageItem("Twitter", "You have a Tweet!", time = "1 hour", icon=icon("twitter")),
notificationItem("This is a notification." ),
taskItem(value = 30, color = "blue", "Dashboard construction") ))
shinydashboard ile Panolar Oluşturma

Birden çok öğe içeren açılır menü ekleme

Birden çok öğeli açılır menü

shinydashboard ile Panolar Oluşturma

Daha fazla açılır menü ekleme

  • Başka bir açılır menü de ekleyebiliriz
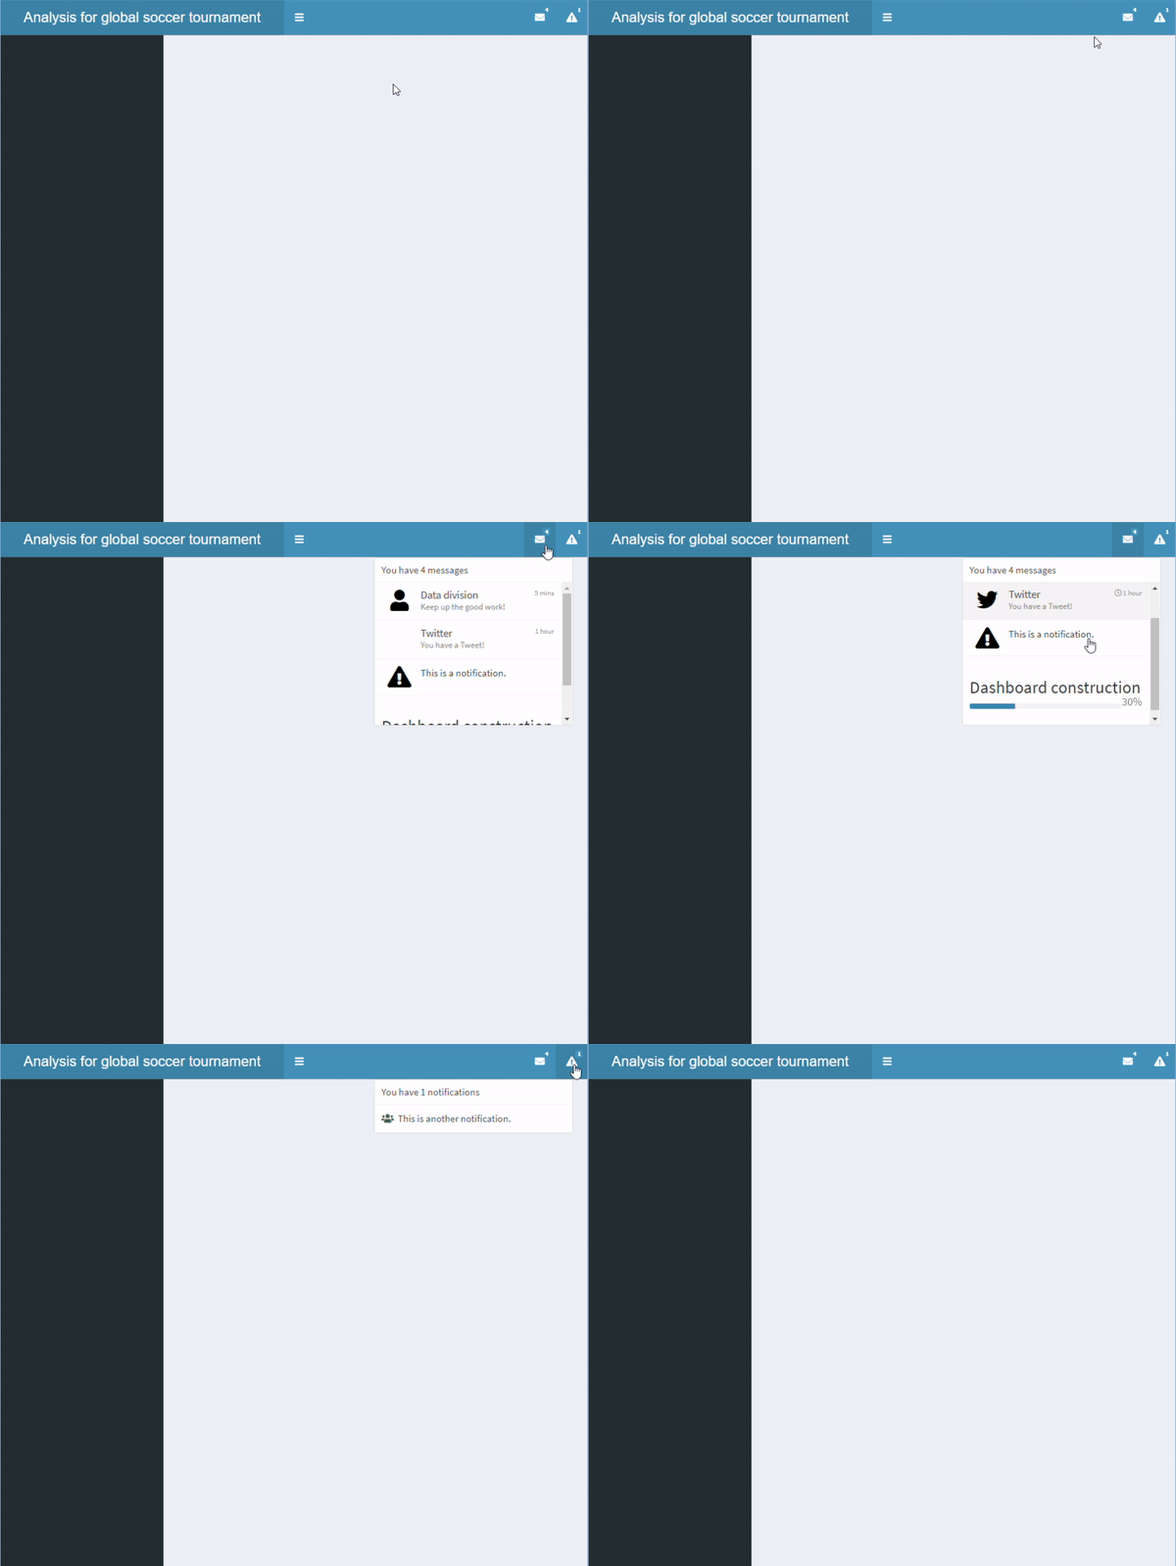
Birden fazla açılır menülü bir başlık.

header <- dashboardHeader(
  title = "Analysis for global soccer tournament",
  titleWidth = 400,

dropdownMenu(type = "messages", messageItem("Data division", "Keep up the good work!", time = "5 mins"), messageItem("Twitter", "You have a Tweet!", time = "1 hour", icon=icon("twitter")), notificationItem("This is a notification."), taskItem(value = 30, color = "blue", "Dashboard construction")),
dropdownMenu(type = "notifications", notificationItem(icon = icon("users"), "This is another notification." )))
shinydashboard ile Panolar Oluşturma

Kenar çubuğu

  • Kenar çubuğu dashboardSidebar() ile tanımlanır
  • Genişlik width ile ayarlanabilir
  • sidebarMenu() bir shinydashboard içinde birden çok sayfa eklemeyi sağlar
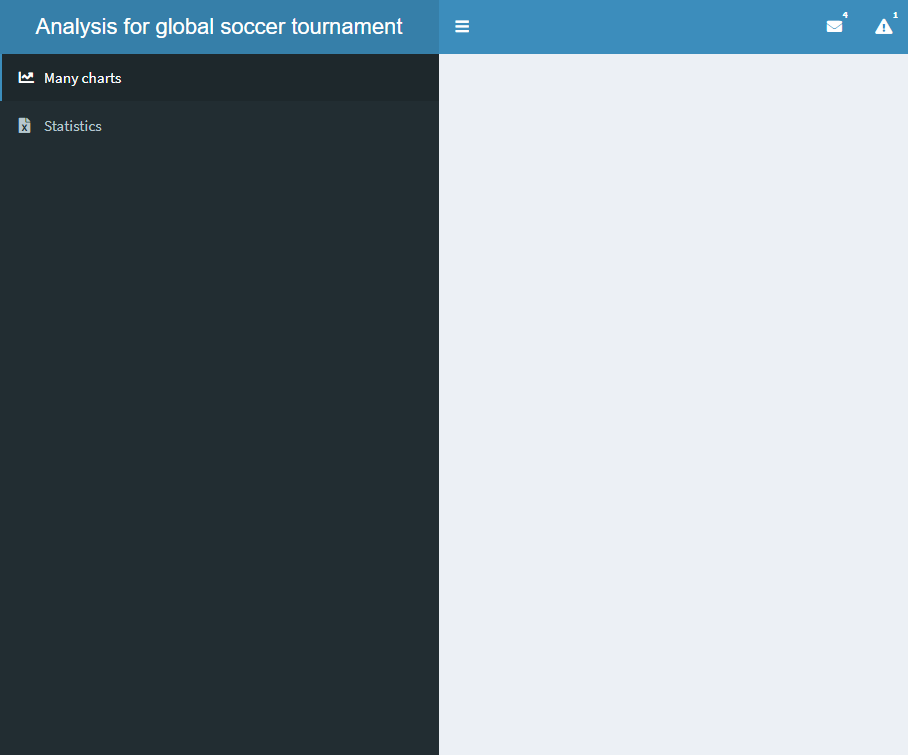
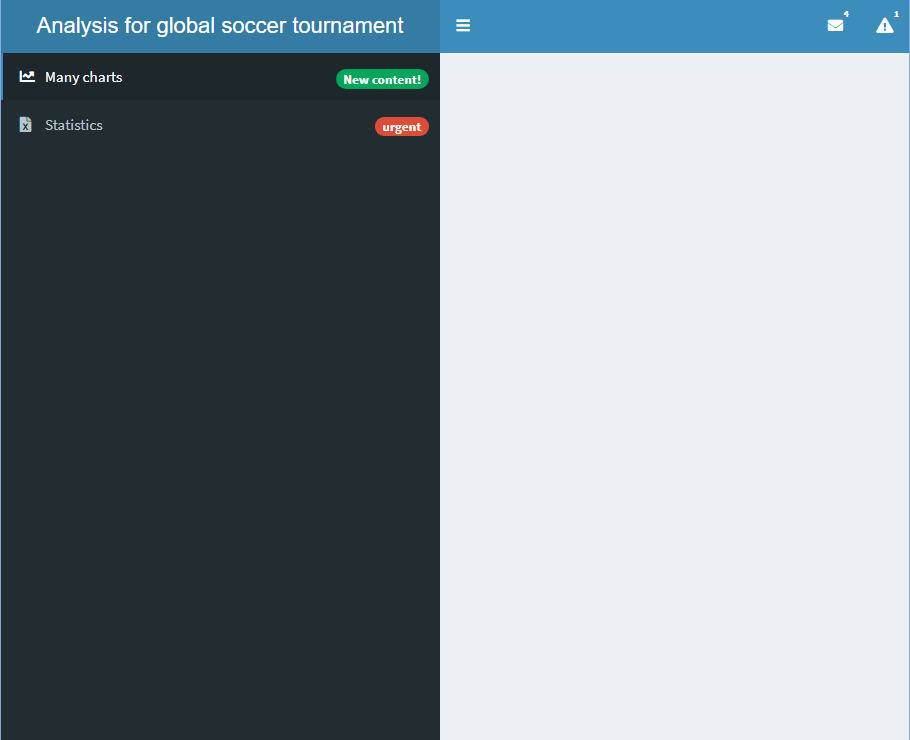
İki düğmeli bir kenar çubuğu

sidebar <- dashboardSidebar()
sidebar <- dashboardSidebar(width=400)
sidebar <- dashboardSidebar(width=400,
  sidebarMenu(
    id = "pages",
    menuItem("Many charts", tabName = "charts", 
        icon = icon("chart-line")),
    menuItem("Statistics", icon = icon("file-excel"), 
        tabName = "stats")
  )
)
sidebar <- dashboardSidebar(disable = TRUE)
shinydashboard ile Panolar Oluşturma

Rozet ekleme

  • Bir rozet de eklenebilir
    • badgeLabel ve badgeColor ayarlayınız

Ek rozetli bir kenar çubuğu

sidebar <- dashboardSidebar(width=400,
  sidebarMenu(
    id = "pages",
    menuItem("Many charts", tabName = "charts", 
             icon = icon("chart-line"),

badgeLabel = "New content!", badgeColor = "green"),
menuItem("Statistics", icon = icon("file-excel"), tabName = "stats",
badgeLabel = "urgent", badgeColor = "red")
) )
shinydashboard ile Panolar Oluşturma

Alt sekmeler ekleme

  • menuSubItem() ekleyerek alt sekmeler eklenebilir
  • Alt sekme içeren bir sekmeye rozet eklenemez
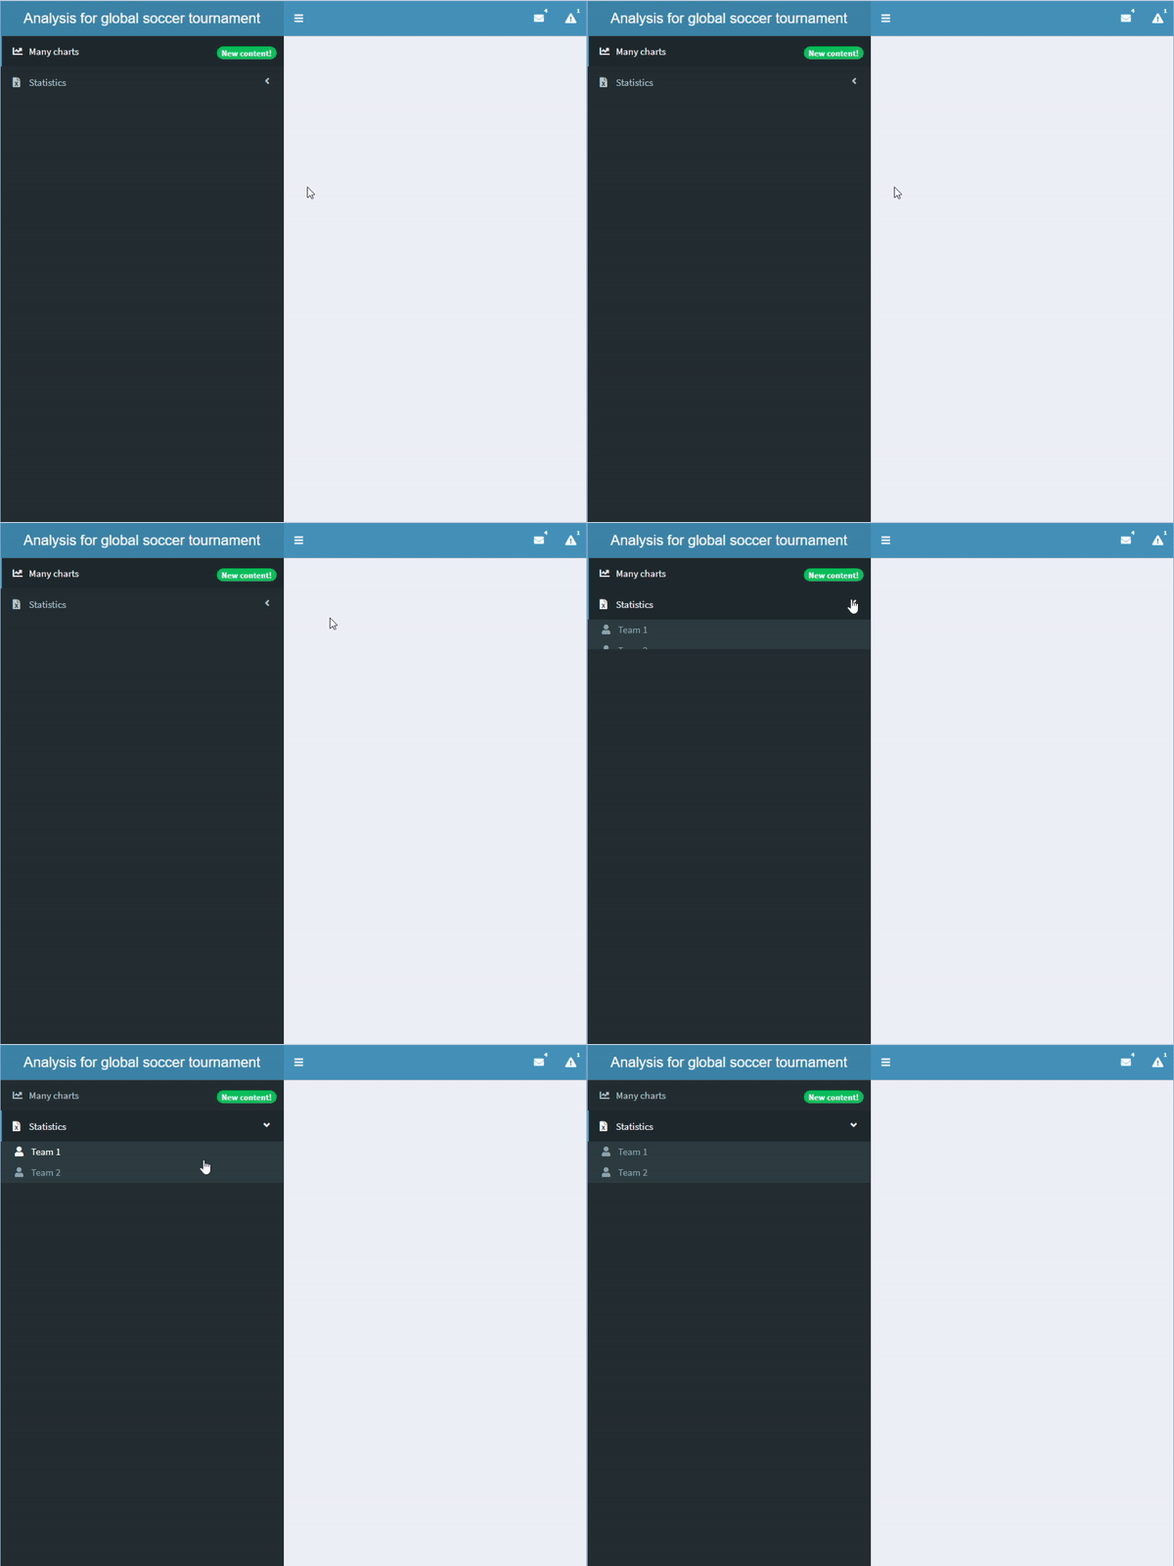
Alt sekmeler içeren bir kenar çubuğu

sidebar <- dashboardSidebar(width=400,
  sidebarMenu(
    id = "pages",
    menuItem("Many charts", tabName = "charts", 
             icon = icon("chart-line"),
             badgeLabel = "New content!", 
             badgeColor = "green"),
    menuItem("Statistics", icon = icon("file-excel"), 
            tabName = "stats", 
            menuSubItem("Team 1", tabName = "team1", 
                     icon=icon("user")),
            menuSubItem("Team 2", tabName = "team2", 
                     icon=icon("user")))
  )
)
shinydashboard ile Panolar Oluşturma

Kenar çubuğuna girdi ve çıktı ekleme

  • Kenar çubuğuna girdi ve çıktılar eklenebilir
  • Girdi ve çıktıları server içinde de tanımlamak gerekir

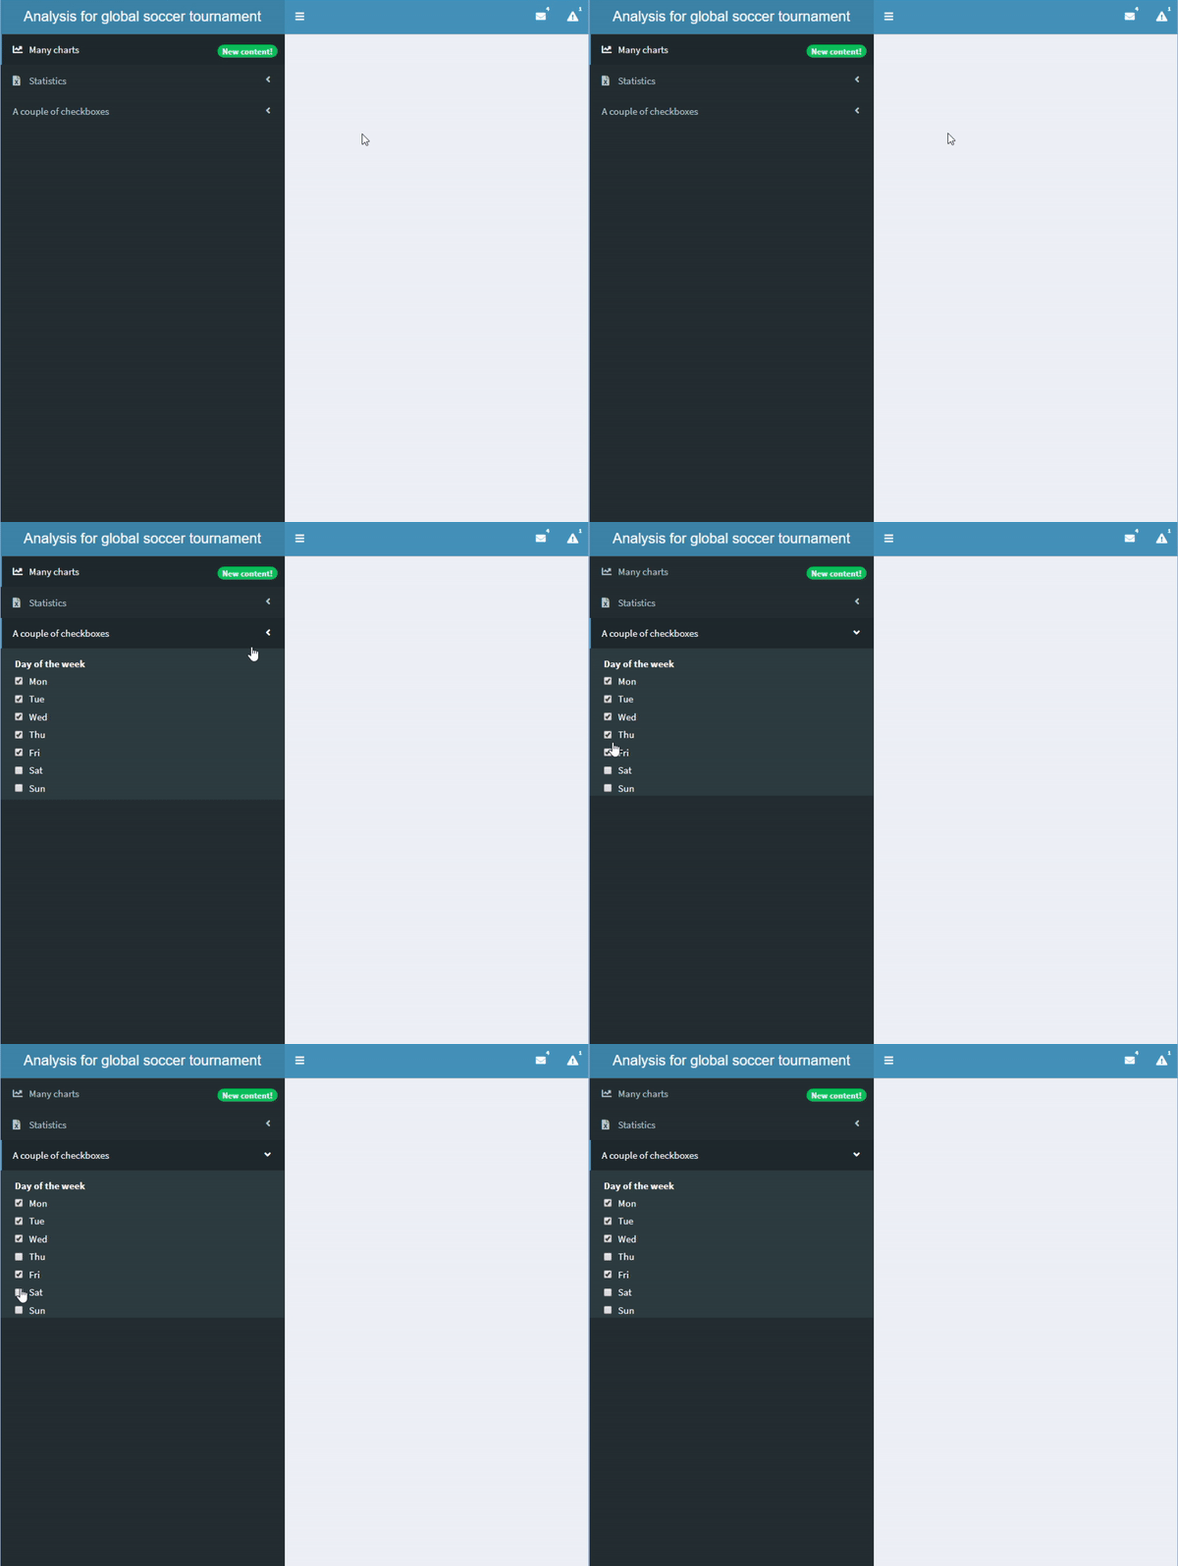
checkboxGroupInput() içeren bir kenar çubuğu.

sidebar <- dashboardSidebar(width=400,
  sidebarMenu(
    id = "pages",
    menuItem("Many charts", tabName = "charts", 
             icon = icon("chart-line"),
             badgeLabel = "New content!", 
             badgeColor = "green"),
    menuItem("Statistics", icon = icon("file-excel"), 
            tabName = "stats", 
            menuSubItem("Team 1", tabName = "team1", 
            icon=icon("user")),
            menuSubItem("Team 2", tabName = "team2", 
            icon=icon("user"))),

menuItem("A couple of checkboxes", checkboxGroupInput("checkboxes", "Day of the week", choices = c("Mon","Tue","Wed","Thu","Fri","Sat","Sun"), selected = c("Mon","Tue","Wed","Thu","Fri"))) ) )
shinydashboard ile Panolar Oluşturma

Hadi pratik yapalım!

shinydashboard ile Panolar Oluşturma

Preparing Video For Download...