NannyML용 데이터 준비

Python으로 Machine Learning 모니터링

Hakim Elakhrass

Co-founder and CEO of NannyML

데이터 불러오기

dataset_name = "green_taxi_dataset.csv"
data = pd.read_csv(dataset_name)
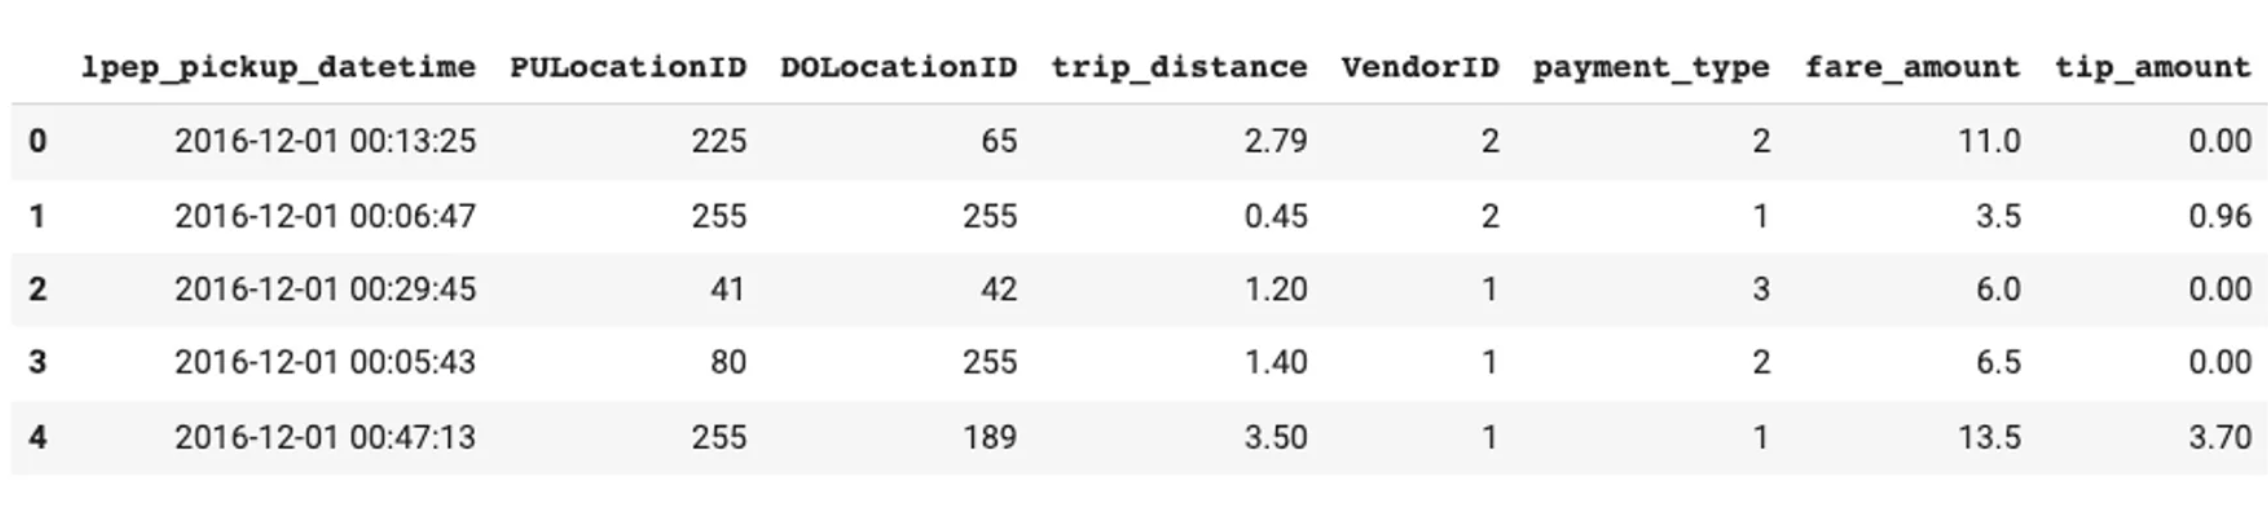
data.head()

이미지는 데이터셋의 처음 5개 행 스크린샷입니다.

Python으로 Machine Learning 모니터링

데이터 처리

# Create data partition
data['partition'] = pd.cut(
    data['lpep_pickup_datetime'],
    bins= [pd.to_datetime('2016-12-01'),
           pd.to_datetime('2016-12-08'),
           pd.to_datetime('2016-12-16'),
           pd.to_datetime('2017-01-01')],
    right=False,
    labels= ['train', 'test', 'prod']
)
Python으로 Machine Learning 모니터링

데이터 분할

# Target column name
target = 'tip_amount'
# Features column name
features = ["PULocationID", "DOLocationID", "trip_distance", "VendorID", "pickup_time"]
# Train set
X_train = data.loc[data['partition'] == 'train', features]
y_train = data.loc[data['partition'] == 'train', target]

# Test set (later reference set)
X_test = data.loc[data['partition'] == 'test', features]
y_test = data.loc[data['partition'] == 'test', target]

# Production set (later analysis set)
X_prod = data.loc[data['partition'] == 'prod', features]
y_prod = data.loc[data['partition'] == 'prod', target]
Python으로 Machine Learning 모니터링

모델 구축

  • lightgbm으로 LGBMRegressor 학습
  • 테스트 세트로 모델 평가
  • 모델 배포
# Training the model
model = LGBMRegressor(random_state=42)
model.fit(X_train, y_train)

# Making predictions
y_pred_train = model.predict(X_train)
y_pred_test = model.predict(X_test)

# Evaluating the model on train and test set
mae_train = MAE(y_train, y_pred_train)
mae_test = MAE(y_test, y_pred_test)

# Deploying the model to production
y_pred_prod = model.predict(X_prod)
Python으로 Machine Learning 모니터링

기준/분석 세트 만들기

기준 기간

  • 테스트 세트 사용

  • 실제값 필요

  • 기준 성능 설정

분석 기간

  • 최신 운영 데이터

  • 실제값 선택 사항

  • NannyML이 데이터 드리프트와 성능을 분석

# Creating reference set
reference = X_test.copy() # Test set features
reference['y_pred'] = y_pred_test # Predictions
reference['tip_amount'] = y_test # Labels
reference = reference.join(
    data['lpep_pickup_datetime']) # Timestamp
# Creating analysis set
analysis = X_prod.copy() # Production features
analysis['y_pred'] = y_pred_prod # Predictions
analysis = analysis.join(
    data['lpep_pickup_datetime']) # Timestamp
Python으로 Machine Learning 모니터링

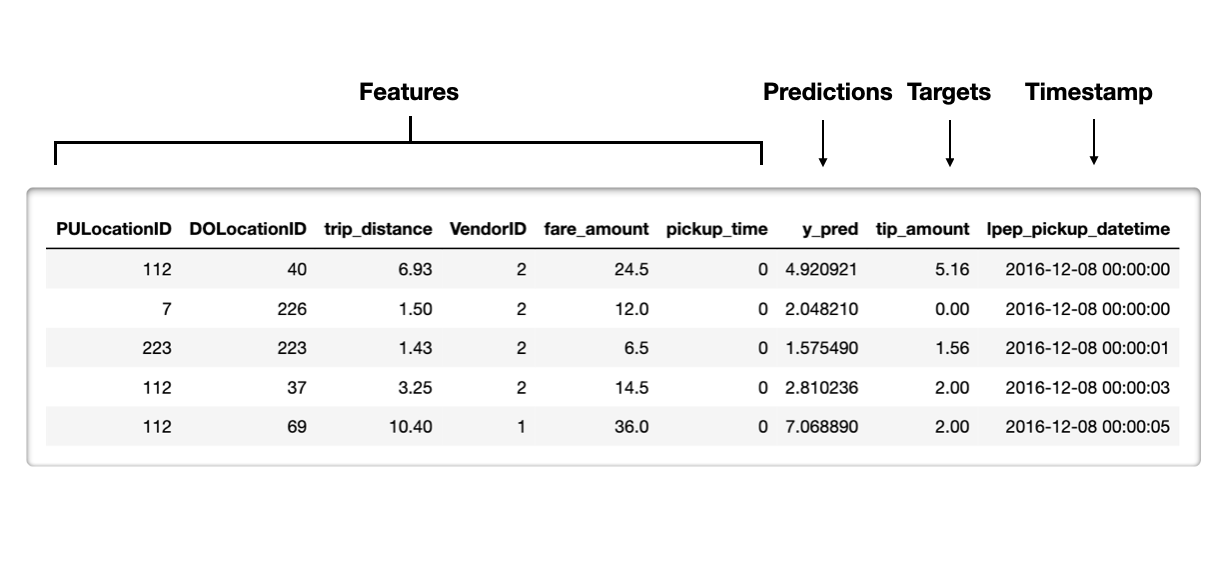
기준 세트 예시

  • 타임스탬프 - 관측 시각(선택)
  • 피처 - 모델에 입력된 특성
  • 모델 출력
    • 예측값 - 모델이 산출한 점수
    • 예측 클래스 레이블 - 임곗값 적용 확률
  • 타깃 - 실제값 포함

이미지는 기준 세트의 처음 5개 행을 보여줍니다.

Python으로 Machine Learning 모니터링

연습해 봅시다!

Python으로 Machine Learning 모니터링

Preparing Video For Download...