使用 U-Net 的语义分割

使用 PyTorch 进行图像深度学习

Michal Oleszak

Machine Learning Engineer

语义分割

  • 不区分同一类别的不同实例
  • 适用于医学影像与卫星图像分析
  • 常用架构:U-Net
使用 PyTorch 进行图像深度学习

U-Net 架构

U-Net 架构示意图

编码器:

  • 卷积与池化层
  • 下采样:降低空间分辨率并增加通道数
使用 PyTorch 进行图像深度学习

U-Net 架构

U-Net 架构示意图

解码器:

  • 与编码器对称
  • 使用转置卷积上采样特征图
使用 PyTorch 进行图像深度学习

U-Net 架构

U-Net 架构示意图

跳跃连接:

  • 连接编码器与解码器
  • 保留下采样丢失的细节
使用 PyTorch 进行图像深度学习

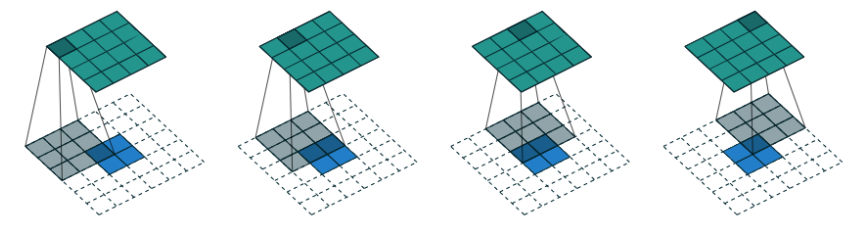
转置卷积

转置卷积示意图

  • 在解码器中上采样特征图:增大高和宽,减少通道数
  • 转置卷积流程:
    1. 在输入特征图之间或周围插入零
    2. 对填零后的输入执行常规卷积
使用 PyTorch 进行图像深度学习

PyTorch 中的转置卷积

import torch.nn as nn

upsample = nn.ConvTranspose2d(
    in_channels=in_channels,
    out_channels=out_channels,
    kernel_size=2,
    stride=2,
)
使用 PyTorch 进行图像深度学习

U-Net:层定义

class UNet(nn.Module):
    def __init__(self, in_channels, out_channels):
        super(UNet, self).__init__()


self.enc1 = self.conv_block(in_channels, 64) self.enc2 = self.conv_block(64, 128) self.enc3 = self.conv_block(128, 256) self.enc4 = self.conv_block(256, 512) self.pool = nn.MaxPool2d(kernel_size=2, stride=2)
self.upconv3 = nn.ConvTranspose2d(512, 256, kernel_size=2, stride=2) self.upconv2 = nn.ConvTranspose2d(256, 128, kernel_size=2, stride=2) self.upconv1 = nn.ConvTranspose2d(128, 64, kernel_size=2, stride=2)
self.dec1 = self.conv_block(512, 256) self.dec2 = self.conv_block(256, 128) self.dec3 = self.conv_block(128, 64) self.out = nn.Conv2d(64, out_channels, kernel_size=1)
  • 编码器:
    • 卷积块
      def conv_block(self, in_channels, out_channels):
      return nn.Sequential(
        nn.Conv2d(in_channels, out_channels),
        nn.ReLU(inplace=True),
        nn.Conv2d(out_channels, out_channels),
        nn.ReLU(inplace=True)
      )
      
    • 池化层
  • 解码器:
    • 转置卷积
    • 卷积块
使用 PyTorch 进行图像深度学习

U-Net:forward 方法

def forward(self, x):

x1 = self.enc1(x) x2 = self.enc2(self.pool(x1)) x3 = self.enc3(self.pool(x2)) x4 = self.enc4(self.pool(x3))
x = self.upconv3(x4)
x = torch.cat([x, x3], dim=1)
x = self.dec1(x)
x = self.upconv2(x) x = torch.cat([x, x2], dim=1) x = self.dec2(x) x = self.upconv1(x) x = torch.cat([x, x1], dim=1) x = self.dec3(x)
return self.out(x)
  • 将输入依次通过编码器的卷积块与池化层
  • 解码与跳跃连接:
    • 通过转置卷积上采样
    • 与对应的编码器输出拼接
    • 通过卷积块
    • 对所有解码步骤重复
  • 返回最后一步的输出
使用 PyTorch 进行图像深度学习

运行推理

model = UNet()
model.eval()


image = Image.open("car.jpg") transform = transforms.Compose([transforms.ToTensor()]) image_tensor = transform(image).unsqueeze(0)
with torch.no_grad(): prediction = model(image_tensor).squeeze(0)
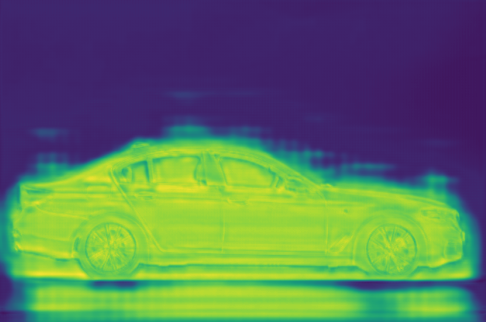
plt.imshow(prediction[1, :, :]) plt.show()

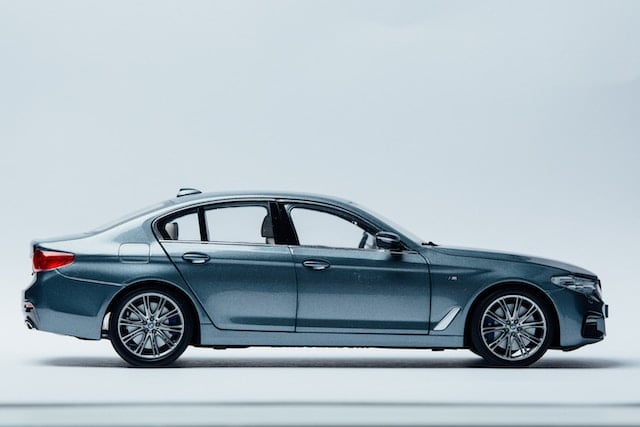
原始汽车图像

语义掩码叠加在汽车图像上

使用 PyTorch 进行图像深度学习

Passons à la pratique !

使用 PyTorch 进行图像深度学习

Preparing Video For Download...