Convolutional layers สำหรับรูปภาพ

Deep Learning สำหรับภาพด้วย PyTorch

Michal Oleszak

Machine Learning Engineer

Convolutional layers สำหรับรูปภาพ
  • นำ convolutional layers ไปใช้กับข้อมูลรูปภาพ
  • เข้าถึงและเพิ่ม convolutional layers
  • สร้าง convolutional blocks


  • ใช้ปรับโมเดลให้เหมาะกับงานเฉพาะ

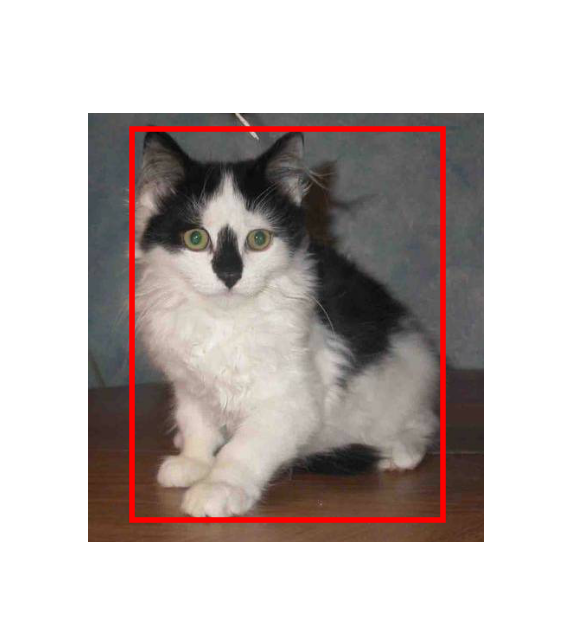
กรอบสี่เหลี่ยมรอบแมว

Deep Learning สำหรับภาพด้วย PyTorch

Conv2d: input channels

ช่อง RGB

  • รูปภาพ Grayscale: in_channels=1
  • รูปภาพ RGB (แดง, เขียว, น้ำเงิน): in_channels=3
  • รูปภาพที่มีความโปร่งใสจะมี alpha channel: in_channels=4
from torchvision.transforms import functional
image = PIL.Image.open("dog.png")
num_channels = functional.get_image_num_channels(image)
print("Number of channels: ", num_channels)
Number of channels: 3
Deep Learning สำหรับภาพด้วย PyTorch

Conv2d: kernel

filters

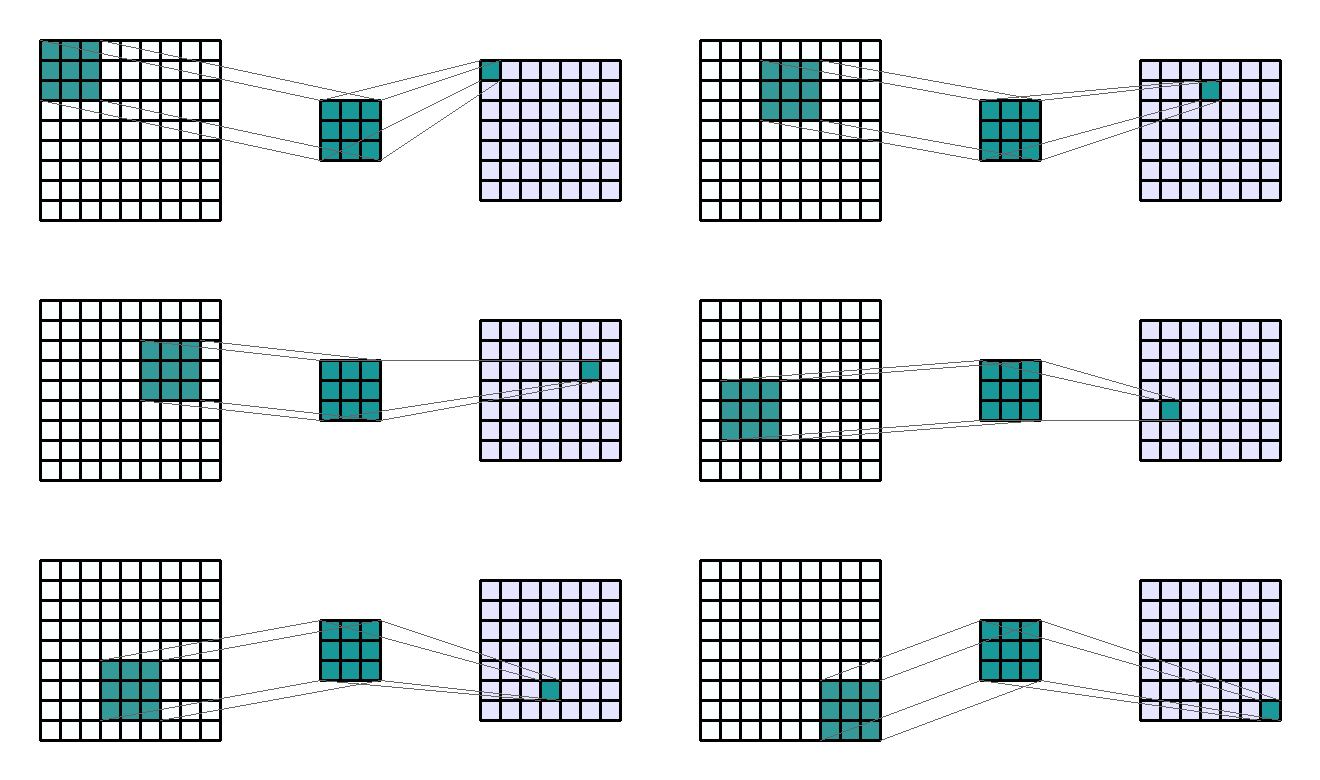
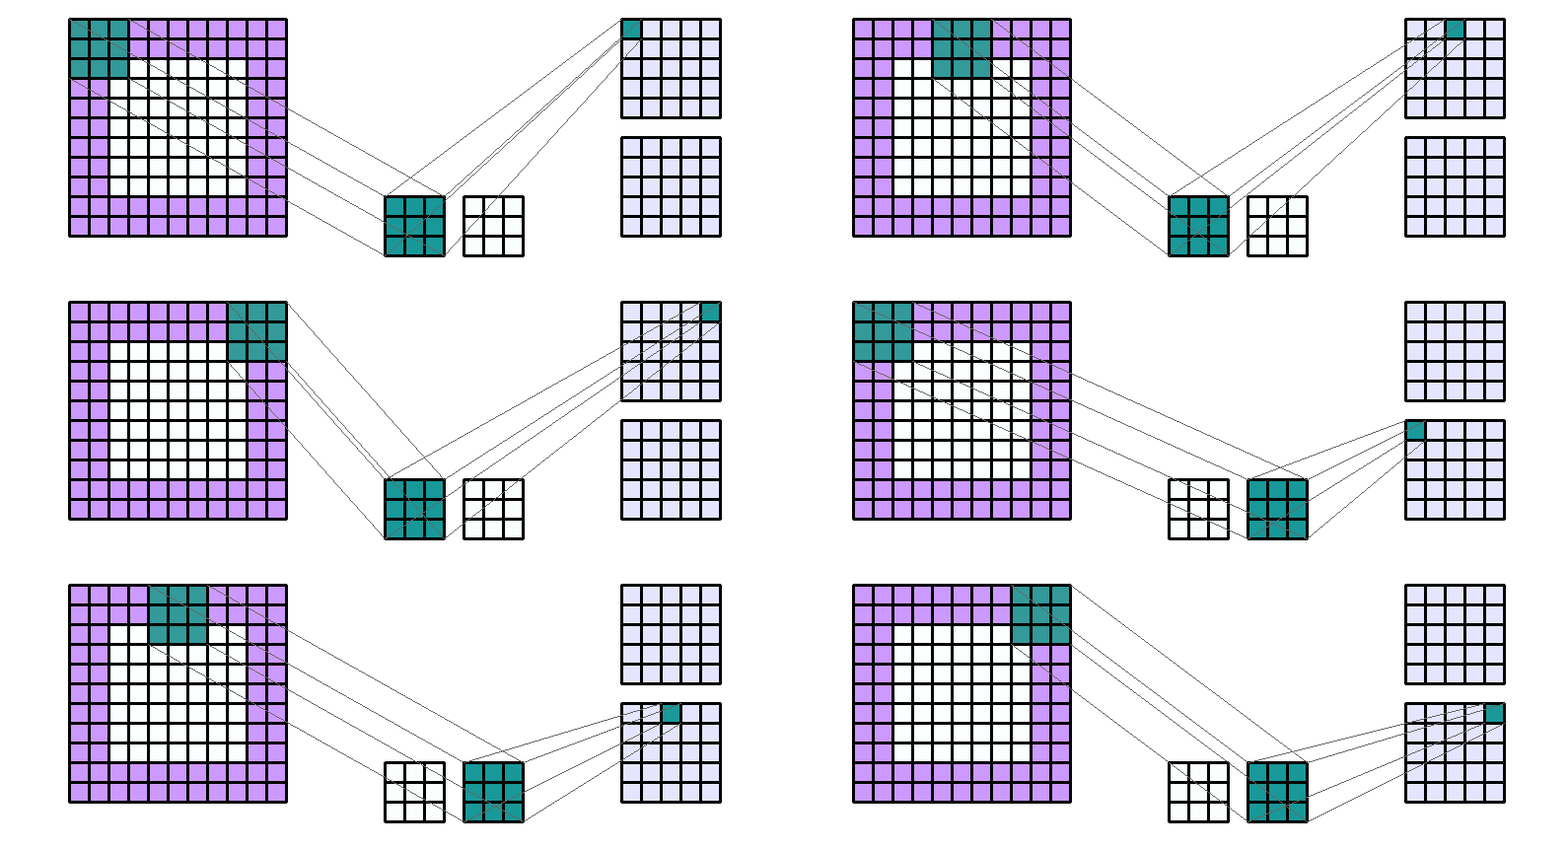
                                        Input tensor               Kernel       Output tensor (feature map)

  • Kernel (สีเขียว) เลื่อนจากซ้ายไปขวา บนลงล่างของรูปภาพ$^1$
1 Thevenot, Axel. 2020. A visual and mathematical explanation of the 2D convolution layer.
Deep Learning สำหรับภาพด้วย PyTorch

ขนาด Kernel

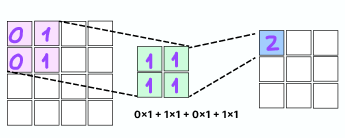
การคำนวณเมทริกซ์

  • ขนาด kernel ที่นิยมใช้: 3x3 (Conv2d) และ 2x2 (MaxPool2d)
  • Convolution คือ dot product ระหว่าง kernel (สีเขียว) กับบริเวณของรูปภาพ (สีชมพู)
  • ผลรวมของ dot product สร้างเป็น feature map (สีน้ำเงิน)
Deep Learning สำหรับภาพด้วย PyTorch

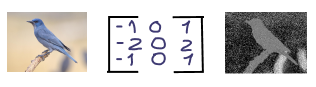
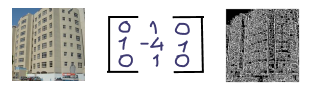
Kernel คือ Filter

  • จับรูปแบบในรูปภาพ

area filter

line filter

Deep Learning สำหรับภาพด้วย PyTorch

Conv2d: output channels

output channels                                             Input channel      Kernel filters     Output channels

  • จำนวน output channels กำหนดจำนวน filter ที่ใช้
  • แต่ละ output channel สอดคล้องกับ filter ที่แตกต่างกัน
  • จำนวน output channels ที่มากขึ้นช่วยให้เลเยอร์เรียนรู้ features ที่ซับซ้อนขึ้น
  • นิยมเลือกจำนวน output channels เป็นยกกำลังของ 2 (16, 32, 64, 128)
    • ช่วยให้การรวมและแบ่ง channels ในเลเยอร์ถัดไปทำได้ง่ายขึ้น
Deep Learning สำหรับภาพด้วย PyTorch

การเพิ่ม Convolutional Layers

import torch
import torch.nn as nn

class Net(nn.Module):
    def __init__(self):
        super(Net, self).__init__()
        self.conv1 = nn.Conv2d(in_channels=3, out_channels=16, kernel_size=3, padding=1)
conv2 = nn.Conv2d(in_channels=16, out_channels=32, kernel_size=3, padding=1)
model = Net()

model.add_module('conv2', conv2)
Deep Learning สำหรับภาพด้วย PyTorch

การเข้าถึง Convolutional Layers

print(model)
Net(
  (conv1): Conv2d(3, 16, kernel_size=(3, 3), stride=(1, 1), padding=(1, 1))
  (conv2): Conv2d(16, 32, kernel_size=(3, 3), stride=(1, 1), padding=(1, 1))
)
model.conv2
Conv2d(16, 32, kernel_size=(3, 3), stride=(1, 1), padding=(1, 1))
Deep Learning สำหรับภาพด้วย PyTorch

การสร้าง Convolutional Blocks

  • การซ้อน convolutional layers ใน block ด้วย nn.Sequential()
class BinaryImageClassification(nn.Module):
    def __init__(self):
        super(BinaryImageClassification, self).__init__()

self.conv_block = nn.Sequential( nn.Conv2d(3, 16, kernel_size=3, stride=1, padding=1), nn.ReLU(), nn.Conv2d(16, 32, kernel_size=3, stride=1, padding=1), nn.ReLU(), nn.MaxPool2d(kernel_size=2, stride=2) )
def forward(self, x): x = self.conv_block(x)
Deep Learning สำหรับภาพด้วย PyTorch

มาฝึกกันเถอะ!

Deep Learning สำหรับภาพด้วย PyTorch

Preparing Video For Download...