Triển khai X-Ray tracing
Giám sát và Khắc phục sự cố trên AWS

John Q. Martin
Principal Consultant
Tổng quan X-Ray SDK
Thông tin chính:
- Ngôn ngữ hỗ trợ: Python, Node.js, Java, .NET, Go, Ruby
- Hai cách: tự động và thủ công
- SDK trao đổi với daemon qua cổng UDP 2000
- Không giao tiếp trực tiếp với X-Ray API
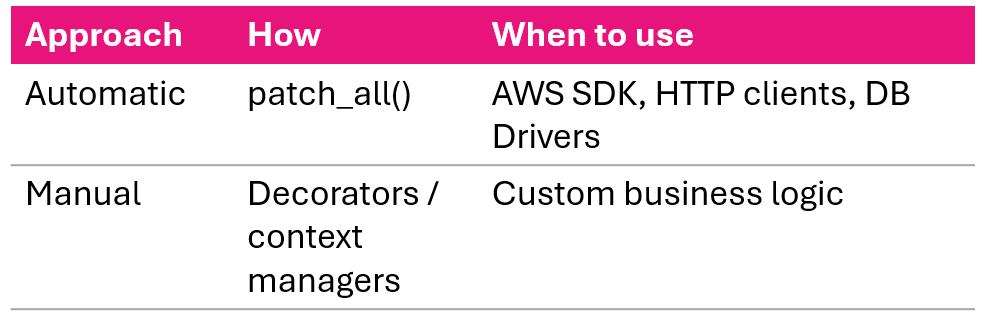
Tự động vs. thủ công:
Python SDK: cấu hình Flask
from flask import Flask
from aws_xray_sdk.core import xray_recorder
from aws_xray_sdk.ext.flask.middleware import XRayMiddleware

app = Flask(__name__)

xray_recorder.configure(
    service='MyFlaskApp',
    sampling=True,
    context_missing='LOG_ERROR',
    daemon_address='127.0.0.1:2000'
)

XRayMiddleware(app, xray_recorder)
Bốn thiết lập của recorder:
- service - tên hiển thị trên service map
- sampling - bật/tắt sampling
- context_missing - LOG_ERROR tránh crash
- daemon_address - nơi gửi các segment
Khi gắn middleware, mọi request vào đều được trace tự động.
Instrument tự động: Python
# Instrument tất cả thư viện hỗ trợ
from aws_xray_sdk.core import patch_all
patch_all()
# Hoặc chọn lọc
from aws_xray_sdk.core import patch
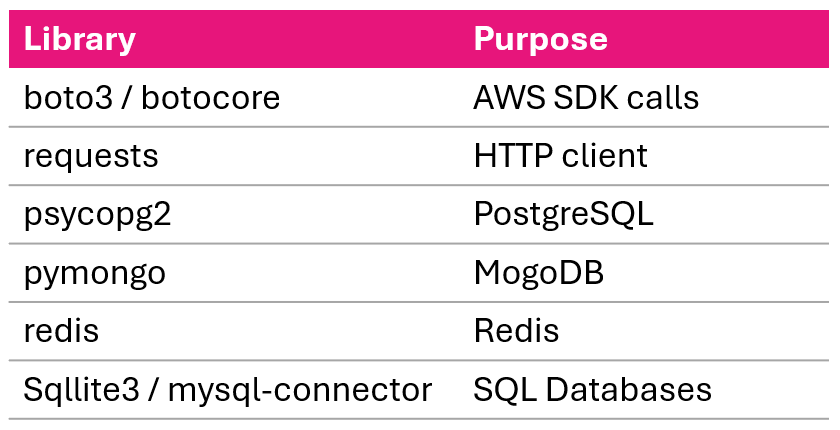
patch(['boto3', 'requests', 'psycopg2'])
Thư viện hỗ trợ:
Instrument thủ công: Python
Cách dùng decorator:
@xray_recorder.capture('process_order')
def process_order(order_id):
    order = get_order(order_id)
    return process_payment(order)
Cách dùng context manager:
def process_order(order_id):
    with xray_recorder.capture('fetch_order'):
        order = db.query(Order).filter_by(
            id=order_id).first()
    with xray_recorder.capture('process_payment'):
        return payment_service.charge(order.total)
Annotation và metadata trong code
Thêm annotation:
xray_recorder.put_annotation(
    'order_id', order_id)
xray_recorder.put_annotation(
    'user_id', user_id)
Thêm metadata (ngữ cảnh chi tiết):
xray_recorder.put_metadata(
    'order_details',
    {'items': order.items,
     'total': order.total})
- Annotation được lập chỉ mục, metadata thì không
- Annotation có kiểu, metadata là JSON bất kỳ
- Dùng chỉ mục để lọc, metadata để debug chi tiết
Xử lý lỗi trong trace
def process_order(order_id):
    try:
        order = get_order(order_id)
        payment = process_payment(order)
        return payment
    except PaymentError as e:
        xray_recorder.put_annotation(
            'error_type', 'payment_failed')
        xray_recorder.put_metadata(
            'error_details',
            {'message': str(e), 'order_id': order_id})
        raise
- Exception trong hàm được trace sẽ được tự động ghi nhận
- Thêm annotation cho loại lỗi để lọc trong console
- Thêm metadata cho chi tiết lỗi đầy đủ
- Luôn raise lại để ứng dụng tiếp tục xử lý lỗi của nó
Node.js SDK: cấu hình Express
const AWSXRay = require('aws-xray-sdk-core');
const xrayExpress = require('aws-xray-sdk-express');
const app = require('express')();

AWSXRay.config([AWSXRay.plugins.EC2Plugin]);

// Mở segment cho mọi request vào
app.use(xrayExpress.openSegment('MyExpressApp'));

app.get('/api/orders/:id', async (req, res) => {
    const order = await fetchOrder(req.params.id);
    res.json({ order });
});

// Đóng segment sau khi phản hồi
app.use(xrayExpress.closeSegment());

// Instrument tự động
const AWS = AWSXRay.captureAWS(require('aws-sdk'));
const https = AWSXRay.captureHTTPs(require('https'));
Triển khai trên Lambda
from aws_xray_sdk.core import xray_recorder
from aws_xray_sdk.core import patch_all

patch_all()  # instrument các lệnh gọi AWS SDK

def lambda_handler(event, context):
    xray_recorder.put_annotation(
        'user_id', event['user_id'])

    result = process_user(event['user_id'])

    return {
        'statusCode': 200,
        'body': json.dumps(result)
    }
Thông tin chính:
- Lambda tự động gửi trace cơ bản khi bật Active Tracing, không cần SDK cho phần này
- Cài X-Ray SDK để thêm subsegment, annotation và instrument các lệnh gọi downstream
- Bật trong console: Configuration → Monitoring tools
- Hoặc trong template:
Tracing: Active
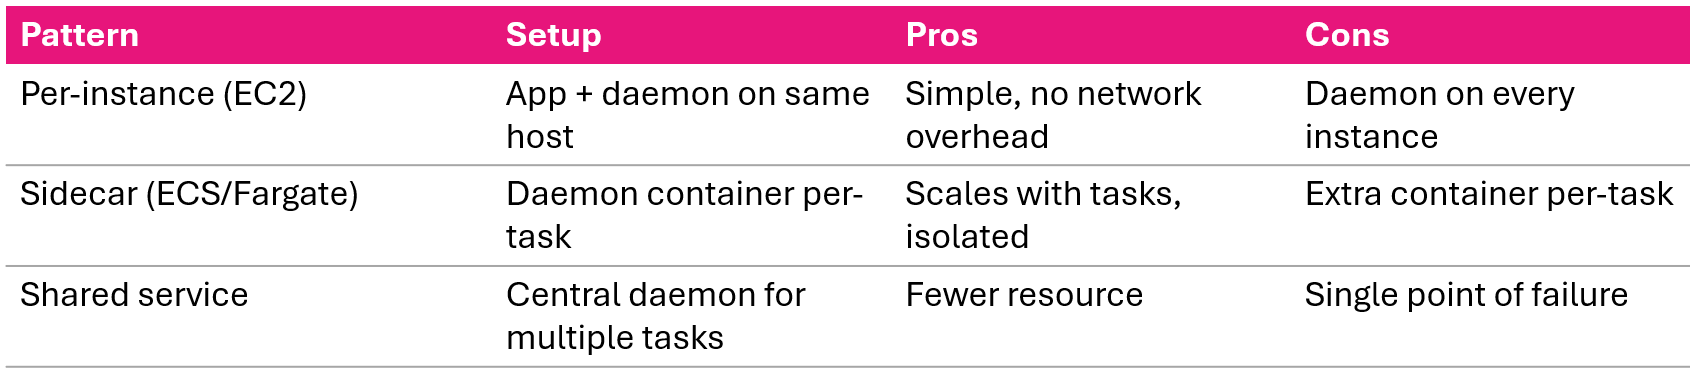
ECS và Fargate: mẫu sidecar
Cấu trúc task:
ECS Task
|_ Application Container
|   gửi tới xray-daemon:2000
|_ X-Ray Daemon Container
    chuyển tiếp tới dịch vụ X-Ray
Cấu hình container ứng dụng:
xray_recorder.configure(
    service='MyECSApp',
    daemon_address='xray-daemon:2000'
)
Task definition gồm:
- Daemon container: image
amazon/aws-xray-daemon, cổng UDP 2000 - App container: biến môi trường
AWS_XRAY_DAEMON_ADDRESS=xray-daemon:2000
Vì sao sidecar?
- Daemon scale cùng task
- Sự cố được cô lập theo task
Cài đặt X-Ray daemon
Cài theo nền tảng:
- Amazon Linux 2
- sudo yum install -y aws-xray-daemon-3.x.rpm
- Ubuntu
- sudo dpkg -i aws-xray-daemon-3.x.deb
- Windows
- xray.exe -f cfg.yaml install
- Docker
- docker run -p 2000:2000/udp amazon/aws-xray-daemon
Sau khi cài:
sudo systemctl start xray
sudo systemctl enable xray
Daemon làm gì:
- Lắng nghe cổng UDP 2000
- Đệm và gom batch các segment
- Chuyển tới X-Ray API qua HTTPS
- Xử lý retry, ứng dụng của bạn không cần làm
Cấu hình daemon
TotalBufferSizeMB: 24
Concurrency: 8
Region: "us-east-1"
Socket:
  UDPAddress: "127.0.0.1:2000"
  TCPAddress: "127.0.0.1:2000"
Logging:
  LogLevel: "info"
  LogPath: "/var/log/xray/xray-daemon.log"
LocalMode: false
- Kích thước buffer, tăng khi lưu lượng cao
- Concurrency đặt số kết nối song song tới X-Ray
- Với container, đặt địa chỉ UDP là 0.0.0.0
- Local mode, true cho dev cục bộ không có credentials
Quyền IAM
{
  "Effect": "Allow",
  "Action": [
    "xray:PutTraceSegments",
    "xray:PutTelemetryRecords",
    "xray:GetSamplingRules",
    "xray:GetSamplingTargets",
    "xray:GetSamplingStatisticSummaries"
  ],
  "Resource": "*"
}
Cách đơn giản nhất
Dùng managed policy AWSXRayDaemonWriteAccess
Gắn cho:
- EC2 instance role
- ECS task role
- Lambda execution role
Thiếu quyền phù hợp, daemon vẫn chạy nhưng âm thầm không gửi được segment.
Mẫu triển khai daemon
Tổng kết bài học
- SDK: instrument tự động với
patch_all(), thủ công với decorator và context manager - Annotation (được lập chỉ mục, có thể tìm) vs. metadata (chi tiết, không lập chỉ mục)
- Lambda: tự gửi trace cơ bản; cài SDK để có subsegment và gọi downstream
- ECS/Fargate: mẫu container daemon sidecar
- Daemon: cấu hình qua cfg.yaml, cần IAM policy
AWSXRayDaemonWriteAccess - Triển khai: per-instance cho EC2, sidecar cho container
Triển khai X-Ray tracing
Giám sát và Khắc phục sự cố trên AWS

