信用風險模型的交叉驗證

以 Python 進行信用風險建模

Michael Crabtree

Data Scientist, Ford Motor Company

交叉驗證基礎

  • 以模擬新資料使用情境來訓練與測試模型
  • 將訓練資料切成多段以估計未來效能
  • 使用 DMatrix,為 XGBoost{{1}} 最佳化的內部結構
  • 提早停止:若評分指標在多次迭代後未提升,交叉驗證即停止
以 Python 進行信用風險建模

交叉驗證如何運作

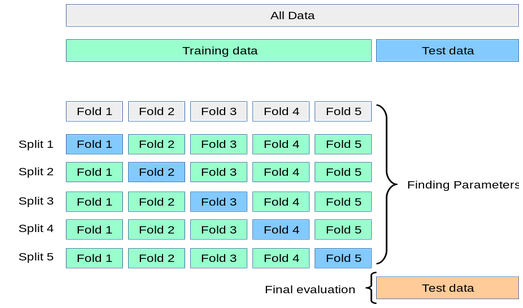
  • 將訓練資料分成多個部分(稱為 folds),並用未使用的部分測試
  • 最後再用實際測試集進行測試

k 折交叉驗證示意圖

1 https://scikit-learn.org/stable/modules/cross_validation.html
以 Python 進行信用風險建模

在 XGBoost 中設定交叉驗證

# Set the number of folds
n_folds = 2
# Set early stopping number
early_stop = 5
# Set any specific parameters for cross validation
params = {'objective': 'binary:logistic',
          'seed': 99, 'eval_metric':'auc'}
  • 使用 'binary':'logistic' 指定 loan_status 的分類任務
  • 'eval_metric':'auc' 指示 XGBoost 以 AUC 評估模型表現
以 Python 進行信用風險建模

在 XGBoost 中使用交叉驗證

# Restructure the train data for xgboost
DTrain = xgb.DMatrix(X_train, label = y_train)
# Perform cross validation
xgb.cv(params, DTrain, num_boost_round = 5, nfold=n_folds,
       early_stopping_rounds=early_stop)
  • DMatrix() 會為 xgboost 建立訓練最佳化的特殊物件
以 Python 進行信用風險建模

交叉驗證的結果

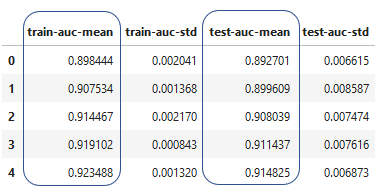
  • 產生包含交叉驗證分數的資料框

交叉驗證分數範例

以 Python 進行信用風險建模

交叉驗證評分

  • 使用 scikit-learn 的 cross_val_score() 進行交叉驗證與評分
# Import the module
from sklearn.model_selection import cross_val_score
# Create a gbt model
xg = xgb.XGBClassifier(learning_rate = 0.4, max_depth = 10)
# Use cross valudation and accuracy scores 5 consecutive times
cross_val_score(gbt, X_train, y_train, cv = 5)
array([0.92748092, 0.92575308, 0.93975392, 0.93378608, 0.93336163])
以 Python 進行信用風險建模

一起來練習吧!

以 Python 進行信用風險建模

Preparing Video For Download...